Friday, April 22, 2016

Ballast

Ballast.  It's the gravel or coarse stone used to form the bed of railroad track.  In the real world, the entire bed that supports the railroad track is made up of dirt, gravel and sometimes a layer of asphalt.  In model railroading, the bed is made up of either cork or foam sub road bed (which gives the track it's elevation above the surrounding terrain), with scale ballast spread between and along the rails to give it the look of a realistic railroad track.  

There are many products out there for sub roadbed and ballast and most of them are great.  I prefer to use cork roadbed for my sub layer and Woodland Scenics ballast for the rock layer.
 
Woodland Scenics makes different colors and sizes of ballast.  It usually comes in a small bag, pictured above, or in a larger shaker canister.  My ballast of choice is Medium Dark Brown.  I know the picture shows Fiine Dark Brown, but I usually use medium ballast.  It's really just a personal preference on the size of the rock.  

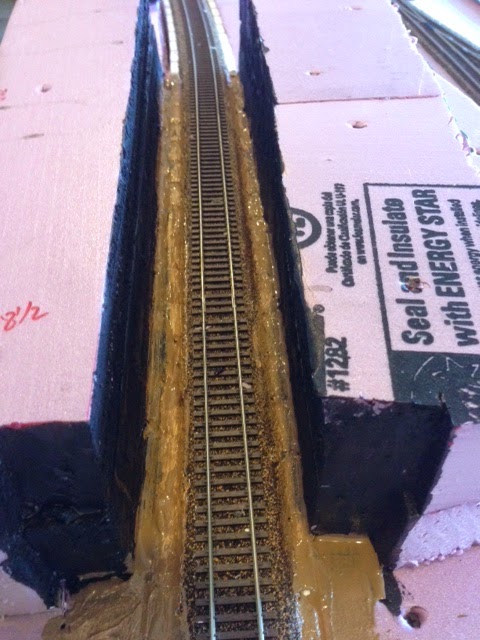
As a rule, I don't usually ballast track until I have had some operating sessions with my trains and I see that everything is running properly.  It's a lot harder to fix defective track when it's sitting in a layer of ballast.  One exception to this is in hard to reach places, like tunnels.  I check and double check the track by pushing random rolling stock over the track before I ballasting and closing up the tunnel.  

To ballast, I sprinkle dry ballast on the track and use artist brushes to smooth it out until it looks the way I want it to look. 

That is followed by a fine spray of 75%water / 25% rubbing alcohol.  This spray is a wetting agent to help hold the ballast in place during glueing.  The alcohol breaks the surface tension of the water and the glue that will be applied next.  If you don't break the surface tension, it just puddles and makes a mess.  Note - some people will use a few drops of dish detergent to break the surface tension, but I find that to be hit or miss, so I stick with alcohol, which works 100% of the time.  


The next step is to apply glue.  You can buy pre made scenic glue at hobby shops for crazy amounts of money.  You get a product that is essentially diluted white glue.  I suggest buying a large bottle of white glue.  You can sometimes find gallon jugs of it.  Combine into a 50/50 mix with water and you have your scenic glue for less cost.  You will need to stir this glue mix before every use, as the glue will tend to separate and settle to the bottom.  

Some modelers prefer to spray the glue mixture.  I will use that method for large areas of grass scenery, but prefer to use a large eye dropper, which you can find in any pharmacy section of your favorite store.  It takes a bit longer, but I feel I have more control and accuracy.  

Make sure the entire ballasted area gets soaked with the glue mixture.  You can then use a paper towel to wipe the rails while they are wet, or a track eraser to wipe the rails after the glue dries.  Don't worry about any glued areas that are white.  It all dries clear in the end.  

Approximately 24 hours later you will have a hard shell of ballasted track.  You should be able to poke at it with your finger and not break anything loose.  If it does, that means your glue did not soak in all the way.   Respray with the fine mist of water/achohol and glue again, making sure it's soaked all the way down.  You can also use this method to fix any missed or damaged spots along the rail.  

At this point, I closed up and finished off the top of the tunnel and mountain.  I will shave and carve the foam mountain at a later date.  


Back on Track

I am attempting to get the Twin Lakes & Western Railroad blog back on track.  I see that I have not posted in almost a year - the last post was in June of 2015.  

I lot has happened to the layout since the last post.  I now have 9 out of 12 module frames built.  I have track laid 4 of the 9 modules, and roadbed laid on 8 of the 9 modules.  

I've moved what has become module #1 from the garage into the spare room - my train room, to work on the scenery and to start adding structures.  

In the past I have suffered from ADD modeling, jumping from one section of the layout to another and another, never really truly completing any one section.  This time I am building all the tables, but really working hard on completing one module at a time.  Although, I wonder if ADD modeling is really just normal model railroading.  There are always so many different projects to work on - bench work, electrical, scenery, painting, structures, details, and the trains themselves - that moving around from task to task is normal. What do you think?  I'd love to see some comments on this topic.  

Anyway, my goal is to do a weekly update on the Twin Lakes & Western.  But first, I may do a few brief blog posts that catch up on the progress of the last year.  

Happy Railroading

Tuesday, June 16, 2015

Streets and Roads Part 2

In part 1 I talked about the materials I use to create roads on my layout.  I'd like to continue this subject with a it more information.


On the module above, my road climbs 4" to a higher level of the town.  This is a complex module with tunnels for track and for the road, as well as incline for the road.  All of this must be completed before I seal up the hillside.  
I used Woodland Scenics 4% grade foam risers for the base of the road, the cut and glued balsa wood for the road surface. 


I painted the road too early.  I should have waited, but I wanted to verify the color.  Anyway, the next step was to install a metal guide wire I each lane of the road.  This wire will allow me to run a Faller Car System at a later point.  The Faller system is used to animate the cars on the layout, allowing them to drive, stop, turn, etc.  I will write more about this later.  For now, I marked out the center of each lane, used a Xacto knife to cut a groove in the road, then inserted the guide wire.  I used super glue to hold the wire in place, then filled the gap with wood putty.  Once it dried, it was sanded and the road was painted.  


I have to make sure the guide wire is installed correctly.  Once I close up the hill, it will be difficult to access.  

Streets and Roads

Building a model train layout requires many hats to be worn, sometimes more than one hat at a time.  These hats can include:  dreamer, artist, civil engineer, traffic engineer, landscaper, architect, electrician,  financier, and many more that I'm sure I'm missing.  

I think this post falls under the civil engineering hat, the designing and building of streets and roads.  Some train layouts don't leave much room for roads, but I think they are an important part of completing the scene.  

On my previous layout I used 1/16th thick 4"x36" balsa wood for my roads, and with great success. It's easy to cut, easy to paint, and gives a nice texture to the scene.  I received many compliments on my roads, so I'm continuing to use balsa.  Why mess with success.

Once my roads are laid out, I just cut the balsa accordingly and glue to the foam using general purpose wood glue.


Many model railroaders do not add any road materials to their crossings, and I have never understood this.  I think they are afraid it will hinder or obstruct the running of trains through the crossing. If done correctly, trains run just fine and the crossing looks more realistic.  I generally build my own grade crossings, but more and more pre made products are available all the time.


Here is a three way intersection with crossings and a sloped road to the right.  Notice the battery being used to weight down the road until the glue dries.  


I use Ceramcoat paints for my roads.  For this layout I will use dark grey on the main roads.  This will eventually get weathered and road markings.


Sunday, June 8, 2014

Tunnel Portals

My latest project is a tunnel portal. I want to get the first tunnel closed up so that I can start shaping the mountain. 


I'm using Woodland Scenics Timber Tunnel Portals for the first of 4 tunnels.  I'm not sure what I will use for future tunnels. I'll decided later. 


The portals are plaster cast with pretty good detail.  There is some flash that needs to be filed off, but overall there is little prep work.  


I chose to use Woodland Scenics paint for this project.  You can use just about any paint that works on plaster.  I wanted to use Burnt Umber.  Its reddish brown in color.  Its a bit more expensive than the traditional acrylic paints you can buy in craft stores, but even with hundreds of color choices at Michaels, I still couldn't find a good brown.


Here is the almost finished product.  I still need to add some detail colors and weathering, which I will do with some paint and a bit of chalk.
  

I also painted the sides of the roadbed in the tunnel.  I used a latex paint.  Nutmeg is the color.  When it dries, I will ballast the track and start closing up the tunnel.  


Sunday, June 1, 2014

Tunnels and Train Stations

I've been spending more and more time on the layout lately.  It's coming along, but its also a bit behind schedule. I had planned on building two module frames a month, which means I should now have 6 built, but I only have 4.  I guess I'll try to get two more built this month.  


This is the main passenger station for the Twin Lakes & Western Scenic RR.  I'm working on the last few details including:  windows, doors, real clocks for the clock tower, and interior / exterior lighting. I also need to do a bit of weathering to the roof.  


This is looking down module 2 and module 1.  I extended the main road onto module 2, which creates a RR crossing seen at the bottom of the pic. To the left, on the near side of the tracks, will be a drive in movie theater.  Farther down on the left will be a KFC, McDonalds, Taco Bell and a Shell Station.  Some sort of small light industry will fill the area on the right side of the road.


I painted the roof piece of the tunnel.


The walls of the tunnel are painted black. I've used dark grey in the past, but this time I want it to be dark in the tunnel. Now I need to paint the roadbed and rails, then ballast before closing up the tunnel.


Looking uphill through the tunnel site.  

Friday, May 30, 2014

Tunnel Work

This week I spent most of my time gluing track and new roadbed down. I also focused on building up some of the base scenery around the first tunnel. 

Three 18 volt batteries act as weights on the track while the glue dries.  This is module #3 as the highline heads up the grade.


Module #4 track risers are in the process of being glued into place and roadbed I have begun laying roadbed. 


The base of the first tunnel is complete, sort of.  The top pieces are not glued in place yet, since I will need complete the inside of the tunnel. I use wood glue and 3" sheet rock screws to build up the pink foam sections.  I find that the wood glue gives a strong bond and is fairly inexpensive.  The screws are have a course thread and help hold the pieces tightly together. Most of the screws stay in the foam, but some will be pulled as I start carving the foam.  I will paint the inside of the tunnel dark grey or black and will probably ballast the track all the way through since its a short tunnel.  Once I complete those tasks, I can close up the tunnel permanently.  


Here is the view from the downhill side of the tunnel.  


The mountain looks pretty square and 'blocky' right now, but after some carving, painting, rock casts, turf and trees, it will look pretty good.  Stay tuned and watch the transformation.  


Here is a view of module #1 from inside the layout.  Brandon, my son, has been busy playing around with building layouts that fit nicely.  This is the look we like the most so far.  The train station will have platforms extending left and right from the main building. The main street buildings are pretty much where they will be placed.  The building on the far side of the tracks is The Toy Factory, where I work in 'real' life.  It sits on the front of the layout because it will have a full lighted interior.